Feedback! Yeah, it can be a problem. Even for a seasoned sound tech.
So, how do we stop it? And how can we prevent it from happening in the first place?
First, let’s define exactly what it is we’re talking about:
What is Feedback?
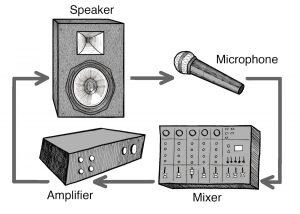
Feedback is the result of sound looping between an audio input and an audio output.

In the case of most live sound systems, feedback is caused by the sound present at a microphone being amplified through the loudspeakers, then returning to that same microphone and being amplified again, or re-reinforced. When left unchanged, this loop becomes perpetual and causes that distinct screech or howl through the sound system as the exact same audio signal is layered and reinforced many times over.
Where does feedback typically happen?
For the average church sound tech, feedback often happens from one of three primary sources:
- The pastor’s lavaliere or earworn mic
- Vocal mics or acoustic guitars
- Choir mics (if the choir is miked)
Most feedback issues tend to crop up due to loud stage volume, improper microphone selection/placement, or poor microphone-to-loudspeaker placement.
If you’d like to learn how to prevent feedback from happening in the first place, then I’ve got some great suggestions. But first, let’s learn three quick ways we can get this annoying worship distraction to stop – fast!
3 Quick Tips to Eliminate Feedback
These three tips are always the first place I start whenever I encounter a problem with feedback.
- Turn it down!
Without being too drastic about it, simply turn down the main output level of the mixing console, or if you can find the offending microphone channel fast enough, turn it down. Often you will only need to turn down the level a small amount to stop the ringing. This volume adjustment can sometimes be imperceptible to the listening audience, but can make a big difference in the quality of the overall sound.
Monitor loudspeakers on stage can cause feedback too, especially for vocal mics and acoustic guitars. Sometimes you just need to turn down the individual input level or dial back the monitor mix just a little bit in the appropriate monitor channel.
- Move it!
Simply moving a microphone or loudspeaker out of the pickup or projection pattern of the other can greatly reduce the chance of feedback. Don’t place a microphone in front of a loudspeaker, and conversely, don’t place a loudspeaker behind a microphone.
Another technique is to move the microphone closer to the source. This allows more signal to reach the microphone from the true source than from the reinforced signal of the loudspeakers.
A common cause of feedback in churches around the world is the improper placement of clip-on lavaliere or “lapel” microphones. While these microphones can be very convenient for clipping onto a variety of clothing or accessories, they are often placed too far away from the presenter’s mouth to be effective for live sound reinforcement. These microphones should be placed high on the chest of the presenter. This gets the microphone closer to the mouth and therefore provides a better signal level. I always recommend placing lapel mics about halfway down the sternum, 6-8” below the mouth.
- EQ it!
If you can’t turn it down or move it, EQ it. It’s amazing what you can pull off with a little finesse on the equalizer. Even a basic High/Mid/Low EQ with sweepable mids on the console can be a huge asset for stopping feedback when you hear it.
Sweepable Mid EQ tips for Feedback:
- Set the level knob of the sweepable EQ to about -6dB
- Sweep the frequency knob slowly across the entire frequency spectrum available
- Listen for changes in the tone of the source you are monitoring and note when the feedback frequencies are diminished
- Adjust the frequency level control back to about -3dB if possible to ensure that maximum tone quality is available from the source in the main mix
- Repeat as needed for multiple microphone channels
EQ can be a great tool, but be careful. Try to make incremental and modest adjustments to your channel EQ when using it for feedback. A little bit can go a long way, and it will definitely impact the overall tonal quality of the audio source you are adjusting.
So to recap, those quick tips are:
- Turn it down!
- Move it!
- EQ it!
Now that we have stopped the oppressive ringing in the sound system, lets move on to prevention.
Stop Feedback at the Source
There are two important rules to follow if you want to prevent feedback:
- Don’t place a microphone in front of a loudspeaker.
- Place the microphone as close to the source as possible.
There are some common instances where rule #1 is violated. Pastor walks out in front of the main loudspeakers. An acoustic guitar player bends down in front of the stage monitor. A microphone is passed around the congregation for announcements or testimony. Etc…
If at all possible, keep active microphones behind and pointed away from loudspeakers.
If that isn’t always possible, or you’re still having trouble with feedback, explore rule #2.
Keep microphones close to the source.
This is normally pretty easy for vocals. Miking instruments and choirs can sometimes make this a challenge though.
Let’s go into a little more detail with this one.
Microphone tips for preventing feedback
Your first job is to select the right microphone.
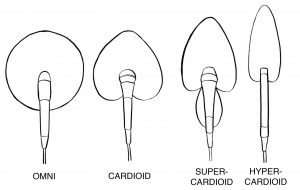
Pay attention to the “pattern” of the microphone. Microphones are available in different directional pickup patterns. Omni-directional microphones pick up sound 360° around the microphone. Cardioid pattern microphones pick up sound mostly in front and around the sides of the microphone. And super-cardioid microphones have an even narrower pickup pattern. (See illustration below.)

Cardioid microphones are probably the most popular and effective choice for your average live sound applications.
As I mentioned earlier, one of the biggest challenges in church sound can be controlling feedback from the pastor’s mic.
If moving a clip-on style lavalier mic closer to the mouth doesn’t work (6-8”), you may need to use one of the increasingly popular low-profile earworn or headset microphones available. (For more pastor’s mic tips and recommendations, check out my post on How To Fix The Pastor’s Mic.)
Since we’re talking about vocal mics, here’s another effective mix tip: engage the low-cut or high-pass filter on your console for vocal mic channels. This cuts off frequencies below 100Hz that can cause unnecessary rumble and low-end feedback.
For choir and instrument miking, you may find super-cardioid microphones useful to capture a really tight pattern of sound at a distance. This can keep monitor noise and stage volume from entering the mic from the sides.
And speaking of stage volume…
VOLUME!!!
A discussion about feedback would be incomplete if we didn’t talk about volume. Namely, stage volume.
I can’t tell you the number of times I’ve encountered a feedback problem where the best solution was to simply turn it down – just a little bit!
The audio source present at the microphone must be louder than the background noise from the speakers. If we can decrease the volume in the speakers just a tiny bit, perhaps that vocalist can be louder in the microphone than their stage monitor.
Keep a handle on your stage monitor volume. Some churches use personal monitor systems to help with this. Just remember that you always have the option of turning it down!
Go forth and practice!
So, those are some quick tips and rules to follow for stopping feedback before it starts.
There are ways to bend those rules, IF you use certain microphones, loudspeakers, EQ, and other mixing techniques. But you’ll always be safe if you abide by the fundamentals mentioned here.
Experiment with microphone placement, using different microphones, and controlling your stage volume. Move on to more advanced techniques like EQ if you still can’t get the sound your after.
And if you want to learn more about how to practice your live sound skills, check out this ChurchTechToday post: How Do Sound Techs Practice?
Lastly, I've written a Free Feedback ebook that may help you out even further – grab it here.


